

Welcome to the arch calculator! Are you interested in adding some archways around your house? Or maybe you're curious about how to make such an archway yourself. Look no further — this calculator can help you determine the measurements you need to draw an elliptical arch.
Of course, not all arches have to be elliptical. You can also use semi-circular, segmental, or pointed arches. But in this calculator, we'll focus on the advantages of an elliptical arch and how we can simplify its drawing method.
Keep reading to find out:
- What an arch is;
- What an elliptical arch is;
- How to calculate an elliptical arch;
- How to draw an elliptical arch; and
- The difference between some types of arches.
🙋 If you're interested in at-home renovations, you might want to check our paint calculator to help you estimate how much paint you'll need to repaint or change the color of a room 🎨
What is an arch? — From Romans to elliptical arches
First things first, what is an arch? Most of us have an idea of what it is, some sort of vertical opening in a wall with a curved top. But of course, If we'd like to be more formal and precise, we might come across definitions like this one:
"An arch consists of an opening in a structure used to span a doorway, window, or any other space. The curved top helps support and evenly distribute the structure's weight through the compression of the elements that compose the arch around its curved profile, resulting in a combination of horizontal but mostly vertical loads."
Why do we use arches? Arches are an elegant solution that architects from ancient civilizations came up with when faced with the problem of covering long spans between two pillars without the structure collapsing. Before the regular use of arches, and in order to achieve great constructions such as the Parthenon or Stonehenge, the main system used was post-and-lintel, which are straight horizontal elements supported by two vertical ones.

The span between the two vertical elements could be shorter or longer depending on the materials used. For ancient civilizations, where the primary construction materials were sticks and stones, the distances were rather short.
And how to cover longer spans with fewer vertical elements? This is where the arch makes its appearance. Some archaeologists attribute the creation of the arches to the Sumerians (around 3000 b. C.), but it was the Romans (between 509 b. C. and 476 a. C.) who perfected the technique and used them widely in different structures, such as aqueducts, bridges, doors, windows, and in 3D versions of arches, such as vaults and domes.
Now you might wonder why these curved structures work better than straight ones. It's unclear whether either the Sumerians or the Romans really knew of the physics behind what was happening — it seems to have been the result of many trials and errors. Nowadays, we can understand why arches work better.
Many ancient constructions were made of stones, clay, or concrete, materials that are resistant to compression but not to tension. These materials are easier to break by pulling from their ends than by pressuring them or stepping on them.
Semi-circular or Roman arches (half-circle arches) were initially made of pieces of stone, shaped as wedges or trapezoids (the voussoirs), and a top central wedge (the keystone). From this top wedge, the weight of the above structure gets distributed by compression from one wedge stone to the next one, undergoing only compression stresses and no tensile stresses. Given the great resistance to compression of stones and concrete, this type of construction results in great resistance and stability, allowing larger spans between columns.
Despite its great advantages and all the advances in architecture and construction that this type of arch has signified over history, they're tricky to use in your home. If you'd like to install a semi-circular arch above an already existing door frame, you'll notice that they end up quite tall, which could result in a very small gap between the top of the arch and the ceiling — or not enough space at all. These semi-circular arches are called high-rise arches due to their height.
So instead of semi-circular arches, you could go for a low-rise arch, such as the segmental arch (a section of an arc of a circumference smaller than 180°) or the elliptical arch. With these, you can adjust the rise to any custom desired measure.
But should you go for a segmental or for an elliptical one? 🤔 The main advantage of an elliptical over a segmental one is that while both can achieve low rises and long spans, the elliptical ones exhibit a relatively lower amount of horizontal loads. This is because, at the joint of the ends of the arch and the pillars, the load becomes completely vertical, which means that less material is required to counteract any horizontal load.
How to calculate an arch — Elliptical arch formula
An elliptical arch, or semi-elliptical arch, is shaped as half of a horizontal ellipse. An ellipse has an oval shape, and in contrast to a circle, an ellipse's radius is constantly changing. This particular characteristic is what makes it more challenging to draw. So, our goal here will be to understand how to draw an elliptical arch.
Before continuing, let's take a moment to review some basic terms related to an ellipse. Note in the image below, we have a horizontal ellipse centered at point . The longest diameter, which is horizontal in our case, is known as the major axis (the distance ), and we call the shortest one the minor axis (distance ).

Other elements we should consider are the focus points and . The distance between the focal points and any point along the ellipse's perimeter () is what we call the focal radii. In the image, this is depicted by the distances and .

A very useful property of ellipses is that the sum of the two focal radii is constant and is always equal to the total length of the arch. In general terms, we can express this as:
If we were to select as the highest point of the ellipse (i.e., ), this same property remains. We then obtain:
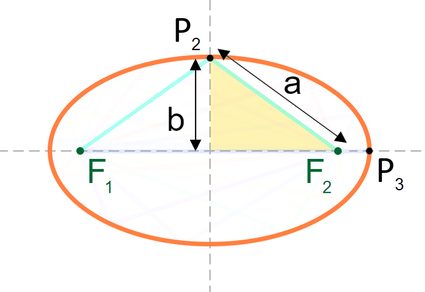
This last equation will come in handy when drawing the ellipse.
Now, we can introduce the ellipse formula, which has the following general form:
where:
- – Coordinates of an arbitrary point on the ellipse;
- – Coordinates of the center point;
- – Distance from the center to the ellipse's horizontal vertex; and
- – Distance from the center to the ellipse's vertical vertex.
💡 We have a dedicated general ellipse tool, the ellipse calculator, where you can continue reading about this geometry. Do you need something more specific? Try our ellipse perimeter calculator or the ellipse area calculator!
How to draw an elliptical arch
Now that we have an idea of some of the terms related to an ellipse, let's continue with our goal of drawing an ellipse.
What you need:
In order to draw the half top of a horizontal ellipse, you'll need the following information:
- The length of the major axis or the length of the arch. This will be the base of the arch.
- The length of half of the minor axis. This corresponds to the arch's height or rise.
- The position of the focus points. Use this arch calculator for this! 😉 Or check our foci of an ellipse calculator for more details on how to locate these points!
These are the tools that you'll need:
- Straight rulers and a 90° ruler 📏📐;
- Pencil or pen ✏;
- A piece of string 🧶; and
- Three nails 🔨
The steps:
There are different methods to draw an ellipse. Here, we'll explain how to achieve this with a string or the string method.
Depending on your project, you might need to draw the ellipse on cardboard to create a template or directly over the surface of the work (drywall, wood, the wall...). In any case, the steps should be quite similar:
-
Measure and draw a straight line for the base of the ellipse.
-
Find the center of this distance, and make a mark to identify it. Point .
-
Using a 90° ruler, a T-square ruler, or any other tool that allows you to draw a right angle, draw a perpendicular line from the center to the top. Since this is the arch's rise, ensure it has the desired length. Make a mark to indicate the top. Point .
-
Now, determine the positions of the focus points. This is where this arch calculator comes in handy 😉 Make some marks on the baseline of the arch to indicate these two points, and .
-
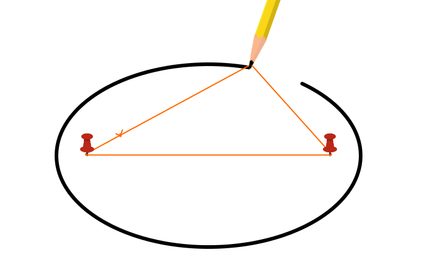
Set a nail (or screws) into each focus point and , and one at the very top, at .
-
Grab a piece of string that's a bit longer than the base of the arch; we'll be surrounding the nails with it.
-
Pass the string around the three nails and tie up the ends of the string to form a triangle. Make sure the string is not too loose. Passing the string around the three nails ensures that the total length of the string is equal to the length of the base.
Alternatively, you can also tie the string to the two focus points for a more stable setup, rather than just surrounding them.
-
Now, let’s draw the outline of the ellipse. To do this, remove the nail at point and, using the string as a guide, grab a pen and push the string while drawing the perimeter of the half top of the ellipse.
Using the arch calculator
This arch calculator will help you draw the rounded section of an elliptical arch. To use this tool, follow these steps:
-
Input the desired arch height or rise.
-
Enter the length of the arch.
-
The calculator will display the positions of the focus points and . Measure from the center to the left and from the center to the right.
-
That's it! All that's left is to follow the instructions from the last section to draw the ellipse.
FAQs
How do I measure an elliptical arch?
You'll need to measure the base's length and the arch's rise. To get these:
-
For the base, use a measuring tape and measure from one door's edge to the other. Make the tape as parallel to the floor as possible.
-
For the arch's height, measure from the base to the highest point you want the arch to be.
-
That's it! With these measurements, you can go on to calculate the focus points and draw the ellipse.
Is an arch half of a circle?
Yes. This is true for semi-circular arches, also known as Roman arches. Different geometries are used for other types of arches, such as half of an ellipse for elliptical arches or a segment of a circle's arc for segmental arches.
How do I calculate an elliptical arch?
For an elliptical archway, you need to calculate the focus points. To get these:
-
Define the length of the base (
2a) and the rise (b) of the desired arch. -
Use the following formula to determine the distance from the center to any of the focus points (
focal distance):focal distance = sqrt(a² - b²) -
Mark these points by measuring the
focal distancefrom the center to the right and from the center to the left. -
That's it! You're ready to trace the ellipse.
How do I draw an elliptical arch?
To draw an elliptical arch, follow these steps:
- Measure and trace a straight line for the arch's base.
- Mark the center and focus points.
- Draw a perpendicular line for the arch's rise.
- Set a nail into each focus point and at the top.
- Grab a string and attach one end at one focus point. Pass it over the top nail and fix the other end at the other focus point.
- With a pen and using the string as a guide, draw the ellipse's perimeter.
What's the focal distance of an elliptical arch of a=440mm and b=300mm?
The focal distance is 321.9 mm To get this number:
-
Substitute the base (
2a) and rise (b) values in the following elliptical arch formula:focal distance = sqrt(a² - b²)focal distance = sqrt((440 mm)² - (300 mm)²) -
Perform the corresponding numerical calculations to obtain the focal distance:
focal distance = sqrt(193600 mm² - 90000 mm²)focal distance = sqrt(103600 mm²)focal distance = 321.9 mm -
That's it! You can always use our arch calculator to test these or other values.