This wainscoting calculator will help you determine the dimensions of your DIY wainscoting project. In this calculator, you will also learn the basics of how to install a wainscoting wall. Wainscoting is a wall siding that is quite similar to what we see in a board and batten wall, and, at the end of this article, we will briefly discuss their differences. Read on to learn what wainscoting is and how we can calculate the wainscoting dimensions.
What is wainscoting?
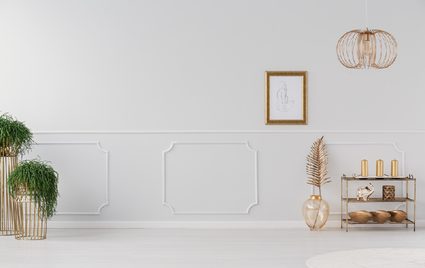
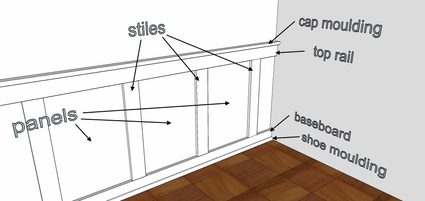
Wainscoting is a decorative wall covering that usually takes up the lower third of a wall. Wainscoting comes in a variety of designs, including the shadow box design, as shown in the above image. Shadow box design, also known as "picture-frame design," is comprised of moldings shaped to rectangular frames that are evenly spaced along the wall. Some other designs are made out of boards like baseboards, stiles, and top rails, like the one shown in the illustration below:
In this calculator, you will be able to determine the wainscoting dimensions and spacing of the panels and stiles, as well as the margin measurements needed to make your wainscoting layout even and pleasing to the eye. You can also solve for the width of the stiles that you should use if you have the desired panel width. Once you've determined your measurements, you can then proceed to install your wainscoting.
How to install wainscoting?
Installing a wainscoting wall is quite an easy project that you can do yourself. You can quickly prop up a DIY wainscoting wall as long as you have the materials, necessary carpentry skills, some painting skills, and our wainscoting calculator. Here are the basic steps to install wainscoting:
-
Measure the length and height of the wall that you want to install wainscoting on. As a rule of thumb, wainscoting is installed to fill the bottom third of the wall's total height. This wainscoting height, also known as chair rail height, is around
32 inchesor approximately80 cmfor an 8-foot high wall. You can still, however, decide to go for a different wainscoting height, depending on your preference. -
Next, choose a wainscoting design that you want to install. If you selected a shadow box design, you'd have to decide whether you want a
fixed panel widthorfixed panel spacings(the distance between two panels). On the other hand, if you decide to go for the recessed panel design, it's best to choose afixed width for the stilesand then compute the panel width. -
Once you have decided on your wainscoting design, the next step is to calculate the measurements of the spacings, widths, and margins, as they depend on the design you chose. For this part of the project, our wainscoting calculator comes in very handy, as it computes both the horizontal and vertical measurements of your wainscoting. For the detailed calculation for these measurements, you can go to the Determining the dimensions of the wainscoting panels section of this text.
-
The next step is to cut the materials to their appropriate lengths. After cutting, you can dry fit them to the wall to ensure that you cut them to their correct lengths. If you have a textured wall, you would need to smooth your wall first by filling in the roughed surface with drywall mud. Once the drywall mud has dried, you can then paint it with a primer followed by paint that is the same as the color of your planned wainscoting.
-
After cutting the wainscoting elements, the next step is to mark their locations on your wall. Use a pencil to mark the total height of the wainscoting and draw a line across the wall as a guide. Also, mark the location of the stiles based on the measurements our calculator provided.
-
Once you're satisfied with the layout, you can now install the wainscoting. It is best to start with the baseboard up to the top rail and the cap molding. For this procedure, it is best to use a pressurized nailer to attach the boards to the wall. Just make sure to hit the studs beneath the wall; you can use a stud finder to locate them. To learn more about studs and framing of walls, you can check out our framing calculator.
-
After attaching everything to the wall, it is best to caulk the corners where the moldings and boards meet the wall. This step will ensure a seamless paintwork afterward. You can use our paint calculator to determine the amount of paint to apply. You can also paint the entire wall to make it look new or cover the rest of the wall above the wainscoting with wallpaper for a different look.
-
Let the paint dry, and admire your work.
Determining the dimensions of the wainscoting panels
Now that we know how to install wainscoting, it is also nice to learn how to manually calculate the measurements in a wainscoting wall project. This knowledge will enable you to analyze other wainscoting designs our wainscoting calculator does not cover.
It is quite easy to do and only requires basic mathematical operations. To solve for the panel width of your DIY wainscoting wall, you can use the equations below:
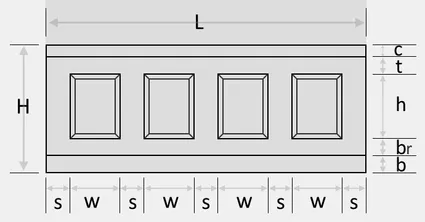
L = (widthpanel + widths) × n + widths + (2 × margine)
where,
- L — Total length of the wainscoting wall;
- widthpanel — Width of the panels;
- widths — Width of the stile or spacing between panels;
- n — Number of panels in the wainscoting wall; and
- margine — Width of the end margins in the wainscoting style you prefer.
By rearranging this equation, we can directly solve for the panel width using this equation:
widthpanel = ((L - (2 × margine) - widths)/n) - widths
On the other hand, to determine the vertical wainscoting dimensions, you can use the equation below:
heighttotal = baseboard + marginbottom + heightpanel + margintop + cap
where,
- heighttotal is the total height of the wainscoting;
- baseboard is the depth of the baseboard;
- marginbottom is the spacing between the baseboard and the panel;
- heightpanel is the height of the panels;
- margintop is the spacing between the cap and the panel; and
- cap is the depth of the cap molding.
We can now also calculate the panel height by rearranging the equation:
heightpanel = heighttotal - baseboard - marginbottom - margintop - cap
If you need to solve the measurements of other wainscoting elements, rearrange the equation by moving the variables from one side of the equation to the other.
Sample wainscoting wall computation
As a sample computation, let us consider a 3-meter (300-cm) feature wall, onto which we want to install a 4-panel wainscoting wall with a chair rail height of 90 centimeters. For this wainscoting, let's say we chose the recessed panel design and we want to use 10-cm boards for the baseboard, stiles, and top rail. To finish the look, let's consider topping it all with a cap molding with a thickness of 2 centimeters. Here is an illustration of this wainscoting layout to help you visualize this example:
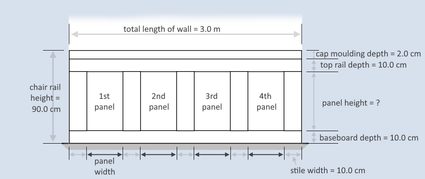
By substituting the values of each variable, we can now solve for the panels' width and height, respectively:
widthpanel = ((L - (2 * margine) - widths) / n) - widths
widthpanel = ((300 cm - (2 * 0) - 10 cm) / 4) - 10 cm
widthpanel = 62.5 cm
heightpanel = heighttotal - baseboard - marginbottom - margintop - cap
heightpanel = 90 cm - 10 cm - 0 - 10 cm - 2 cm
heightpanel = 68.0 cm
Based on our computation, we would need to cut the 10-cm boards to 68.0 centimeters for the stiles. We then have to install these stiles with 62.5 centimeters of spacing between each adjacent stile. For the baseboard, top rail, and cap molding, we need to cut them to a length as long as our 3.0-meter wall.
Wainscoting VS board and battens wall
When choosing from among the different available wainscoting designs, you may encounter what is called "board and battens." Like wainscoting, board and battens is also a wall siding that people use to decorate walls. Board and batten closely resembles the recessed panel style because they both have stiles (or battens) in their designs. However, in board and battens, the stile spacing is very small compared to stile spacing in wainscoting. Here is an example of a board and batten wall:

We can purchase wainscoting and board and battens wall parts in sets made out of a variety of materials like wood, MDF (medium-density fiberboard), PVC (polyvinyl chloride), and vinyl. If you're interested to learn more about wall sidings, you can check our vinyl siding calculator.
If you plan to fabricate your wainscoting elements from scratch, you can use our plywood calculator and our drywall calculator to help you estimate the cost of your materials.