
With this smartphone projector calculator, you can build your own projector and watch (again) your favorite movies using your very own projected screen. It's surprisingly easy and cheap. We just need the right measurements, and we will show you how with this smartphone projector calculator.
In this project, you will learn how to build a simple DIY smartphone projector with just a magnifying glass and a shoebox. Read on to learn how to set up your smartphone projector, and find out what the focal length of your magnifying glass is using your DIY smartphone projector and the thin lens equation. Finally, you will be able to use this knowledge to find the perfect distance between your smartphone projector and the projection screen or wall for sharp images.
Prefer watching rather than reading? Learn all you need with this video we made for you:
💡 If you have a regular projector, use the projector calculator to find the optimum distance between the projector and the screen.
Materials and tools needed
For this project, you will need the following materials and tools:
- A shoebox (or any other carton box);
- A convex lens or a magnifying glass;
- Hot glue;
- Adhesive tape;
- Some corrugated cardboard;
- Black paint or black paper (optional);
- Pen or pencil;
- Scissors or craft knife;
- Measuring tape, meter stick, or yardstick; and
- A blank wall as a projection screen (preferably white).
You can usually find these materials lying around your home right now. If you don't have a magnifying glass yet, you can get one cheaply for as low as $3 per piece online compared to getting an actual $100 portable projector! 😃 It's amazing how some simple materials and a little physics can save you a lot of money!
Are you ready to start building? Let's now see how to turn your smartphone into a projector!
💡 If you would like to learn all about lens magnification, check out our magnification of a lens calculator.
How to build your smartphone projector?
If you have ever wondered how to set up a smartphone projector, here are the steps to follow:
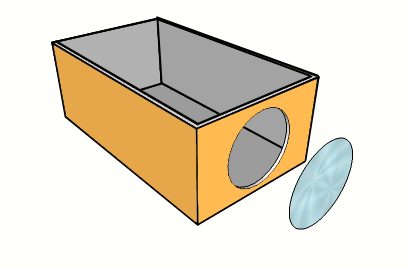
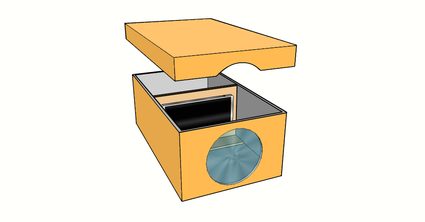
- The first step is to make a hole on the short side of the shoebox where you can tightly fit your lens. You can do this by tracing the lens's perimeter on the box's side using a pen. Once you've outlined the circle representing the lens, use your scissors or craft knife to carefully cut the hole.
-
Once you've cut the hole, fit the lens in place with a dab of hot glue or some strips of tape. In this process, avoid applying too much glue or tape to maximize the aperture of your projector. If you are using a magnifying glass, you don't have to remove its frame. Instead, you can keep it on and glue the frame to the box.
-
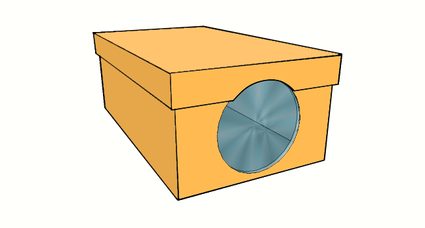
Cover the box and see if the lid covers the lens. If it covers a portion of the lens, cut the lid so that the entire lens is visible, just like the one shown in the image below:
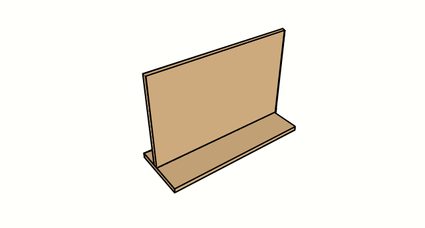
- Now that we've made the main body of our DIY smartphone projector, the next step is to make a makeshift stand for your smartphone. This stand will hold your smartphone in the box and allow you to adjust its distance from the lens. To accomplish this, cut two rectangles of corrugated cardboard with lengths that can fit the width of your shoebox. Glue them to form an inverted T like the one shown below.
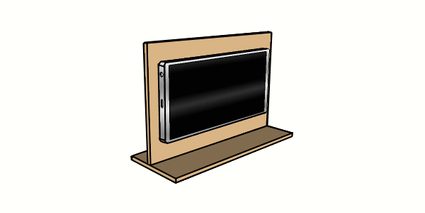
- You can add some reinforcements like triangular counterforts made from corrugated cardboard to ensure that your stand can support your smartphone. With some strips of adhesive tape, temporarily fix your smartphone onto the vertical portion of your makeshift stand, as shown below:
- Optional. To enhance the image, you can paint the inside of the box with black paint or cover it with black paper to prevent the light from "bouncing" inside the box. Although this is optional, reducing this bounced light ensures a clearer image projection.
Now, your DIY smartphone projector is done! 🙂
How to set up your smartphone projector
After you've built your smartphone projector, you can now use it to project images onto a wall or a projection screen. All you have to do is set your smartphone to its brightest setting, position it inside the box, and face the lens side towards your wall or projection screen.
Dim the room or turn off the lights, just like when using an actual projector to better see the image you want to project. Move your DIY smartphone projector closer to or farther away from the wall to focus the image. If the image gets more blurry when moving it closer to the wall, try moving the projector farther away from the wall.
Once you've found the right position, you will notice that the image projected would be inverted – rotated 180° and flipped horizontally at the same time. For this situation, we can only get away with the rotation of the screen by locking the smartphone's screen rotation settings and rotating the smartphone around just like the one shown below:
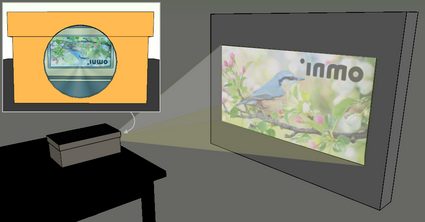
The projected image will still be flipped horizontally, but at least the image will be upright. If you really want to fix the flipping of the image, perhaps to view texts in the projected image, there are apps that you can use to edit your image files and videos to flip them horizontally (or vertically). On the other hand, you can also add a mirror to your DIY smartphone projector to flip the projected image.
Nevertheless, you can now enjoy your DIY smartphone projector for a movie night or display some pictures on the wall. Just don't forget to plug your smartphone into its charger because it could lose its charge really fast with its screen brightness at the highest level. An external speaker would also be great for movie nights. 🙂
⚠️ If you can't seem to get a sharp image with your DIY smartphone projector, it could be that the focal length of your lens is longer than your shoebox. In this case, you would either need to use a thicker lens with a shorter focal length, use a longer shoebox or extend your DIY smartphone projector with another shoebox. This is because, for your DIY smartphone projector to work, you must place your smartphone farther back than the focal length of your lens.
Some experiments with your smartphone projector
Wait! Before you put away your smartphone projector after watching a movie, you can take a few measurements to find your magnifying glass or lens's focal length since everything is in place.
All you have to do is measure the distance of your DIY smartphone projector from the wall, as well as the distance of your smartphone to the lens. Try to do this so that you measure to the center of the lens and not to its surface, as shown below:

Then, using the UV method, which is derived from the thin lens equation, we can then find the focal length of our lens using the equation below:
f = u × v /(u + v)
where:
f— Focal length of your lens;u— Distance of the smartphone to the center of your lens; andv— Distance of the lens' center to the wall.
You can confirm your calculated focal length using our smartphone projector calculator by entering the values for the distances u and v.
Using our smartphone projector calculator
How far should I put my smartphone projector from the wall?
Once you know the focal length of your lens, you can use our smartphone projector calculator to easily determine where to place your smartphone in your projector and how far to place the projector from the wall to get a sharp image. To do this, you have to do the following:
- If you used our tool to find the focal length of your lens, you first have to reload our calculator, which clears your viewing setup values.
- Re-enter the
focal length of your lens. - Enter either distance
uorvto calculate the other.
What is the focal length of the lens I'm using?
From the earlier section, after focusing the image and measuring u and v, you can simply input their values in our smartphone projector calculator to instantly find your lens' focal length. However, it would be best to take multiple data points by changing u and finding the new v that would result in another focused image on the wall. Use the values of u and v to calculate the focal length several times. By calculating the average of these focal length values, we can get a more precise value of the lens's focal length.
At the bottom part of our smartphone projector calculator, you will also see some information about the magnification details of the projected image for your current viewing setup. There, you will see if the projected image is enlarged, reduced, or the same size as your smartphone. 🙂
Want to try some other DIY projects?
If you found this project fun and would like to try something exciting and learn something new, check out our YouTube video, where we show you how to by using our diffraction calculator.
If you decide to watch on your TV instead, you might also want to check our TV mounting height calculator to know if your TV of any screen size is positioned to its ideal mounting height to avoid neck strain or back strain while watching TV.