In this projectile motion experiment calculator, you will create a launcher and explore the principles of parabolic projectile motion.
After taking the measurements of a few launches, you will determine the velocity of the projectile. You will then be able to predict the flight path of the projectile based on different launch angles and launch heights.
Learning objectives
By participating in this experiment, you will:
- Learn the definition and basic concepts of projectile motion;
- Become familiar with the projectile motion equations;
- Gain an intuitive understanding of how initial velocity, projectile range, time of flight, and launch angle are related; and
- Demonstrate best practices in lab safety.
Please note, that it is easiest to complete this experiment with a partner, although this is not strictly necessary.
Background: What is projectile motion?
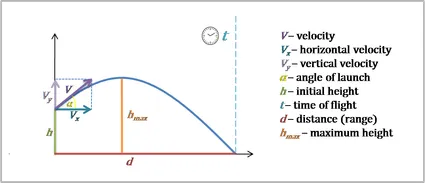
Imagine an archer sending an arrow into the air. It starts moving up and forward, at some inclination from the ground. The further it flies, the slower its ascent is – until it finally starts descending, moving now downwards and forwards and finally hitting the ground again. If you could trace its path, it would be a curve called a trajectory in the shape of a parabola (ignoring air resistance). Any object moving in such a way is in projectile motion. If you'd like to learn more about it and the governing equations, the trajectory calculator is a way to go.
In this experiment, we will only consider the one major force acting on a projectile – the force of gravity. Air resistance is ignored. If you drew a free-body diagram of such an object, you would only have to draw one downward vector and denote it as “gravity.”
Depending on your learning objectives, you can either use the calculator alone or use the equations to try to work out the answers independently. The neat thing about the projectile motion calculator is that it also works 'in reverse'. For the experiment, you will enter the time of flight, distance, and initial height and the calculator will help you find the launch angle and initial velocity.
Materials
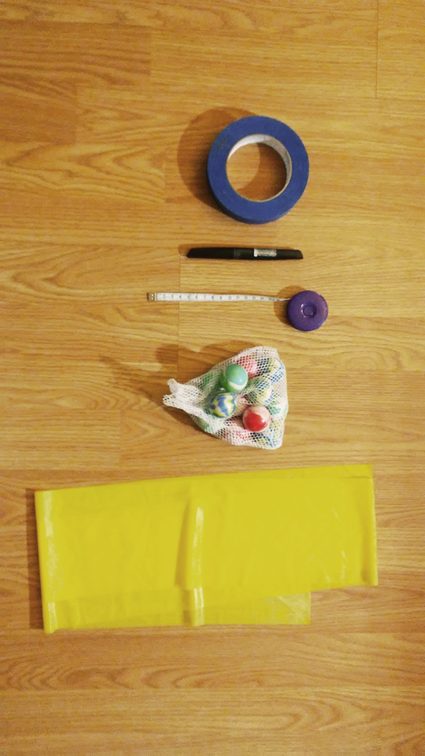
To make the launcher we recommend, you will need:
- A flat exercise band (light resistance is best), such as TheraBand;
- A rubber bouncy ball;
- A four-legged chair; and
- Magazine holder or other reference object (optional).
To measure the trajectory, you will need:
- A measuring tape or meter stick;
- Masking tape;
- A marker;
- A stopwatch or a smartphone that can take videos; and
- Goggles or glasses for eye safety.
If you're feeling adventurous, you may replace our launcher with any launcher of your choice. Please keep the following in mind:
- Do not use a launcher that endangers others or would cause damage to your home or classroom;
- Projectiles with higher density will produce more accurate results. For example, if you use a ping pong ball then you probably won't succeed, as its trajectory is greatly affected by air resistance. However, objects that are too dense and hard can also be a safety hazard; and
- The launcher should be consistent (it should shoot with the same power with every shot).
Methods
1. Clear the pathway
Before setting up the launcher, first clear the launch pathway. Ensure that there are no windows, mirrors, or breakable objects in the line-of-sight. An open space or hallway that is 6 to 7 meters long should give you enough room to do the experiment comfortably. Alert anyone nearby about your activity so that they don't accidentally walk in front of your launcher and get hit.
2. Set up the projectile launcher
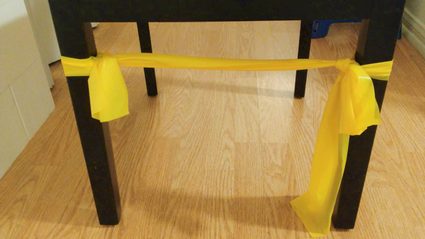
Place the chair at one end of the launch pathway. Tie the resistance band across the two front legs of the chair. Use a regular overhand knot, and secure it with a slip knot to make it easy to undo later on (similar to how you tie your shoelaces). Tie the knots so that there is no slack between the chair legs – you want the resistance band to be a straight line all the way across. Try to tie the band without any twists, as this will help the projectile fly smoothly out of the band.
3. Practice launching the projectile

It's time to refine your launch technique. But first, a word on safety: a bouncy ball at high speeds could cause injury, especially damage to the eyes. Never shoot at another person or animal intentionally, and do everything possible to ensure the area is clear.
Spread the resistance band open and place the bouncy ball right in the middle. Stand next to the chair and do not set up the shot if anyone is in front of the chair. Do not put your face directly behind or in front of the line-of-sight to avoid accidentally getting hit in the face. Bring your arm behind the launcher and pinch the top and bottom of the bouncy ball, making sure the opening in the resistance band faces forward. Pull back gently on a downward angle, about 45 degrees. Let go, and watch the bouncy ball fly!
Start off pulling back very lightly and gradually increase the power until you have a good trajectory. Make sure the ball doesn't hit any walls – you need the ball to hit the ground uninterrupted after it flies so you can measure the projectile range correctly.
4. Make your shots consistent
All good experiments are repeatable. Making repeatable shots can be challenging because of Hooke's Law; the farther you pull back the resistance band, the faster and farther it will shoot because you are storing more potential energy in the band. In order to make your shots repeatable, you need to pull back the resistance band by the same amount each time. We recommend that you place an object behind the launcher as a reference so you can draw the launcher back the same distance for each shot. We used a magazine holder.
5. Measure the launch
You will be measuring:
- The initial height of the projectile;
- The time of flight; and
- The horizontal travel distance of the projectile (i.e., range).
To find the initial projectile height, use the measuring tape to measure the height of the resistance bands where it is attached to the chair legs. Record this number.
To determine the time-of-flight, you can either take a video and look at the time stamps or use a stopwatch. If you are using a smartphone, you can set up the camera so that it can see the launch pathway or ask a friend to video your launch.
To measure the horizontal travel distance, have your partner stand near the end of the launch pathway (out of harm's way) with the masking tape and have them mark the floor with a piece of tape where the bouncy ball lands. Use the marker to write down the trial number on each piece of tape so you don't forget. If you don't have a partner, you could also lay a blanket down to prevent the ball from bouncing, making it easier for you to mark its landing spot.
Record the launch three times, taking care to make each launch as similar as possible. Once you're done, use the measuring tape or meter stick to measure the distance to each landing spot from the chair's front legs. Record these numbers as the horizontal travel distance or projectile range. Check out the projectile range calculator to see how it can vary depending on the setup.
Next, look at your videos and note down the time stamp for the start and end of each launch. Calculate the time-of-flight for each launch trial by subtracting the start time from the end time. If you need help subtracting time, try using our time duration calculator.
For those who might be interested in more tools for motion analysis, we used a free program called to measure the time-of-flight and label the video below:
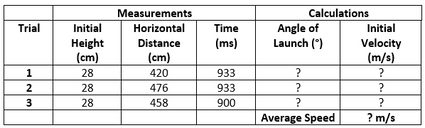
Record all of your measurements and calculations in a table. Calculate the angle of launch and initial velocity for each trial using our projectile motion calculator. Finally, calculate the average initial velocity of your launcher. Here's an example table:
To use the projectile motion calculator, simply fill out the Initial height (h), Time of flight (t) and Distance (d) fields.
If you wish to view additional details like the horizontal and vertical components of the initial velocity, simply select the Show more variables checkbox at the bottom of the calculator.
Discussion questions
No experiment is complete without reflection! Here are some questions to get you started:
- What was the average velocity of your launcher? Did it surprise you?
- If you used the same launcher at a 20 degree launch angle, how far would you expect the projectile to travel horizontally?
- If you were to repeat this experiment, how would you improve your launcher design or shooting method to make the launches more consistent?
- If you launched three balls on the moon of equal size and shape with the same initial velocity, weighing 20 g, 30 g and 40 g, which ball would go the farthest? Why?
- If you launched the same three balls on Earth, which ball would go the farthest? Why?
- Why do you think Galileo used a bronze ball covered in ink for his projectile motion experiments?
We hope you had fun doing the projectile motion experiment with our calculator and learning about projectile motion! Keep reading to learn about the projectile motion equations and have a look at the FAQ.
Projectile motion equations
To develop a deeper understanding and practice your algebra, you may like to try calculating your answers by hand and just using our calculator to check your work.
For convenience, we've provided the essential projectile motion equations below. In the following equations, note that V is the initial velocity, α is the launch angle, and g is the acceleration due to gravity. The projectile motion equations fall into two categories:
-
Launching the object from the ground (initial height h = 0):
-
Horizontal velocity component:
Vx = V × cos(α);
-
Vertical velocity component:
Vy = V × sin(α);
-
Time of flight: t = 2 × Vy / g;
-
Range of the projectile:
R = 2 × Vx × Vy / g; and
-
Maximum height: hmax = Vy² / (2 × g).
-
-
Launching the object from some elevation (initial height h > 0):
-
Horizontal velocity component: Vx = V × cos(α);
-
Vertical velocity component: Vy = V × sin(α);
-
Time of flight:
t = [Vy + √(Vy² + 2 × g × h)] / g;
-
Range of the projectile:
R = Vx × [Vy + √(Vy² + 2 × g × h)] / g; and
-
Maximum height:
hmax = h + Vy² / (2 × g).
-
FAQs
How do I find acceleration in projectile motion?
There is only one force acting vertically on an object in projectile motion – gravity. This means that any change in vertical speed is due to gravitational acceleration, which is 9.81 m/s2 (32.2 ft/s2) on Earth.
In the horizontal direction, if we assume that air resistance is negligiblethe acceleration would be 0.
What are the characteristics of projectile motion?
Absent of air resistance, no change in the projectile's horizontal velocity, and a constant change in its vertical velocity due to gravity are the characteristics of projectile motion. In these conditions (without air resistance), the shape of the trajectory is a parabola.
Who first accurately described projectile motion and when?
Galileo was the first person to describe projectile motion accurately. By breaking down motion into a horizontal and vertical component, he realized that the plot of an object's motion would always be a parabola.
In his experiments, Galileo used a bronze ball for a projectile, and, due to its density, he was able to ignore the effects of air resistance. His discovery of the parabolic nature of projectile motion is recorded in his manuscripts as early as 1604-1608.
Why does a projectile follow a curved path?
An object follows a parabola because of how its two components of motion – the horizontal and vertical – are affected by gravity. The horizontal component is not affected by gravity at all, and so horizontal velocity is constant (ignoring air resistance). The vertical part, however, is constantly affected by gravity, and so it will increase in height and then decrease, accelerating downward due to gravity.
Why is 45 degrees the optimal angle for projectiles?
The equation for the distance traveled by a projectile being affected by gravity is sin(2θ) × v2/g, where θ is the angle, v is the initial velocity, and g is the acceleration due to gravity. Assuming that v2/g is constant, the greatest distance will be when sin(2θ) is at its maximum, which is when 2θ = 90 degrees. This means θ = 45 degrees.