
This RAID calculator will eliminate any confusion you have about which RAID level to choose (RAID – Redundant Array of Inexpensive/Independent Disks). It explains each of the commonly used RAID configurations and compares them based on storage size, RAID performance, fault tolerance, and cost. Therefore it allows you to make an informed choice about the configuration of your next RAID array. It compares the following RAID levels:
- RAID 0
- RAID 1
- RAID 1E
- RAID 10
- RAID 5
- RAID 50
- RAID 5E
- RAID 5EE
- RAID 6
- RAID 60
What is a RAID array?
If this is your first time configuring a RAID array, you might be unsure as to exactly what one is. Let's explain.
In the early days of computing, mainframes used large and expensive hard disks, designed to be highly reliable. The thing is that when they fail (everything fails eventually), all of the data would be lost (unless you had a backup), and the expensive disk would need to be replaced. Soon cheaper hard drives came along, but they were not very reliable at all, with failures being all too common. What was the solution? Use many disks together, acting as one.
RAID is an acronym that stands for Redundant Array of Inexpensive Disks or, occasionally, Redundant Array of Independent Disks. It allows the creation of a single logical disk (looks like one disk from the computer's point of view) made up of many cheap hard drives. Now there are many ways to arrange and configure these inexpensive hard disks, depending on whether you want high performance (e.g., for video editing), high reliability, low cost, or something in between. These are known as "RAID levels", and we are going to explore what they are and their characteristics in the following sections.
Please note that whatever RAID configuration you choose, you still need to backup the data. Preferably to magnetic tape, but you could also use online remote backup or a second RAID array. Just make sure there is a complete copy of the data somewhere else. Ideally, two copies.
RAID 0 – striping (RAID 0 calculator)
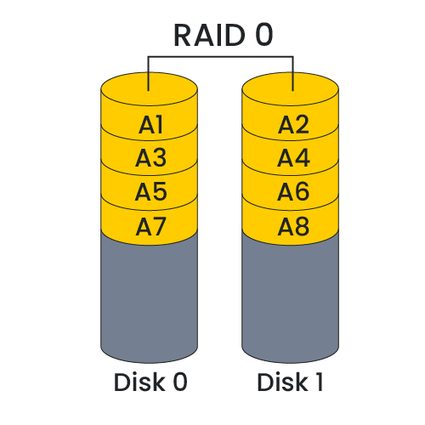
RAID 0 is all about performance. Data is divided into blocks and written alternately to each RAID hard drive. So, in the diagram above, odd-numbered blocks are written to disk 0 and even blocks to disk 1. This process is called striping in RAID terminology. However, both writing and reading can happen simultaneously, so the performance is double that of a single disk. Even better, if you use three disks in RAID 0, and you would get 3x the read and write performance. You would only be limited to the maximum number of disks you could connect to a single RAID controller.
There is a major downside to this stellar performance. If even one disk failed in a RAID 0 array, you would lose all your data. RAID 0 is excellent for situations where you need maximum performance (e.g., gaming), and the data exists somewhere else, such as a more fault-tolerant RAID array or on magnetic tape.
🙋 Data transfer calculator can help you estimate how long it'd take to back up your data on another drive. Alternatively, if you prefer cloud solutions, bandwidth calculator is for you.
RAID 1 – mirroring (RAID 1 calculator)
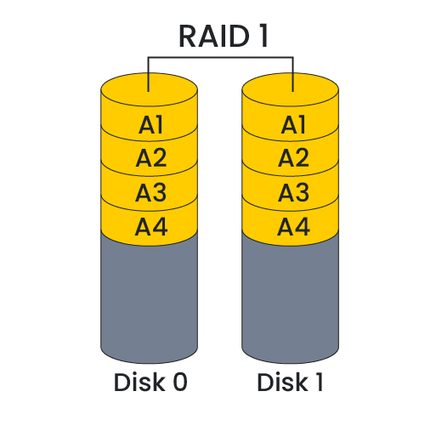
In contrast to RAID 0, RAID 1 is all about fault tolerance and reliability. The data is mirrored on each drive, so even if one drive fails, you still have all your data on the other drive. The performance, however, is nowhere near as good as RAID 0. The write performance will be the same as writing to one disk since the RAID writes the same data to both disks simultaneously. For reading, in theory, the maximum speed should be the sum of the speeds of the two disks. However, in practice, it is usually considerably slower. You'll need to choose your RAID hardware and software carefully to maximize read performance.
You might think to add more disks to a RAID 1 array, but this will have the effect of dramatically increasing the cost per usable capacity. If you had three mirrored drives, then two disks could fail without data loss. However, the usable size would only be a third of the total capacity of the disks. Other RAID levels offer excellent reliability at less cost.
What is RAID 5? – parity (RAID 5 calculator)
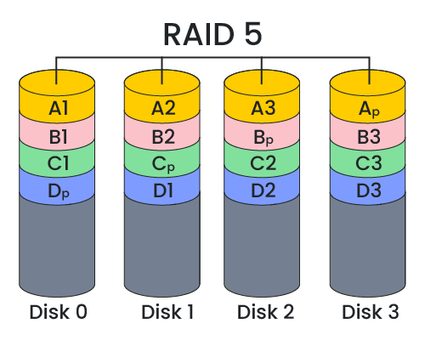
A RAID 5 array is similar to RAID 0, as data is striped across several disks. However, to make it more fault-tolerant than RAID 0, a particular block of data called a parity block is effectively written to an extra disk. Therefore, the minimum number of drives is 2 + 1 – two drives for the actual data and one for the parity.
So how does parity help with fault tolerance? If we look at the diagram above, we see that the data labeled A is split into 3 parts plus a parity, Ap. Let's say that disk 1 fails, meaning that A2 is lost. It can be recovered in a process called rebuilding, where the RAID array is fixed using the parity block. Its contents are such that all the data blocks plus the parity block equal zero when XOR'ed together. That means A2 can be computed using A1, A2, and Ap.
Rebuilding a RAID array takes time and a significant amount of processing power. Rebuilding reads all the data from the remaining disks, calculates the lost data, and writes the recovered data back to disk. It does not scale well with today's enormous hard drives and could take hours, if not days to complete. During the rebuilding operation, the array will be vulnerable to another disk failure, which would mean a total loss of data. If you used the 3d render calculator, the rebuilding is somewhat similar: Highly time- and resource-consuming and frustrating if something fails.
In terms of performance, a RAID 5 array's maximum read speed is a factor of the number of disks minus one, given that there is effectively one parity drive. There is no similar performance gain for writing, as the RAID controller writes each block to a single disk at a time and calculates the parity data for each complete stripe.
RAID 6 – double parity (RAID 6 calculator)
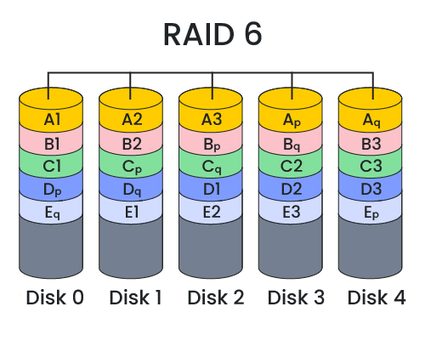
RAID 6 extends the idea behind RAID 5 and uses a second parity block, allowing two disks to fail without data loss. Now, if one disk fails to cause the RAID to rebuild, and then another drive fails, no data will be lost, making it twice as fault-tolerant as RAID 5.
RAID 1E – striping and mirroring (RAID 1E calculator)
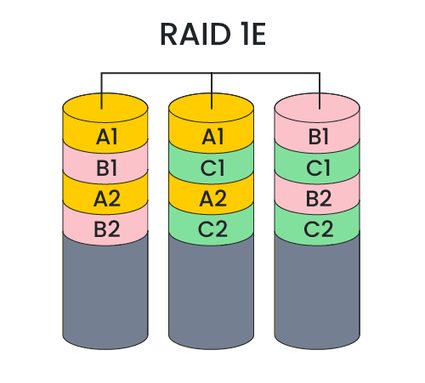
RAID 1E combines data striping and data mirroring. It mirrors a data strip on one disk to the next disk across, using a minimum of three disks. If one disk fails, no data is lost. Try covering one disk with your finger. Notice you can still read all the data. The disadvantage is that usable capacity is only 50% of the raw disk space. It's a good solution if you have to use an odd number of disks, but if you have an even number, then RAID 10, discussed next, will be better in terms of fault tolerance.
RAID 10, 50 & 60 – nested RAID levels
These RAID levels combine the previously discussed RAID 1, 5, and 6 with striping (RAID 0) at a higher level. Let's start by looking at the diagram for RAID 10 (1+0).

What is RAID 10? RAID 10 consists of two or more sets of mirrored disks striped together. RAID 10 allows a total of 2 disk failures, one per mirrored set. RAID 10 naturally only works with an even number of disks and always has a usable capacity of 50%. Theoretically, maximum read performance is a multiple equal to the number of drives in the array, and the write performance is a multiple equal to half the number of disks (since the RAID writes each block twice). The minimum number of drives for RAID 10 is 4.
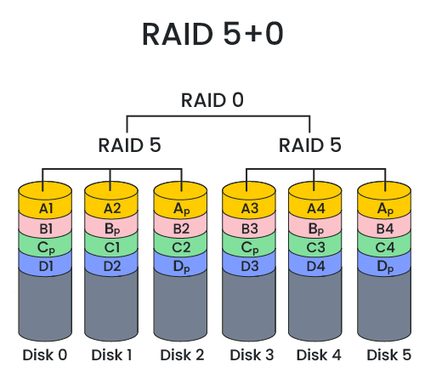
RAID 50 combines several RAID 5 arrays and stripes them together. Similar to RAID 10, one disk per sub-array can fail without data loss. The advantage of RAID 50, however, is that the usable capacity utilization starts at 67%. There is no gain in write performance over a single drive, but the read speed can be up to a multiple of the total number of disks minus the number of RAID 5 sub-arrays.
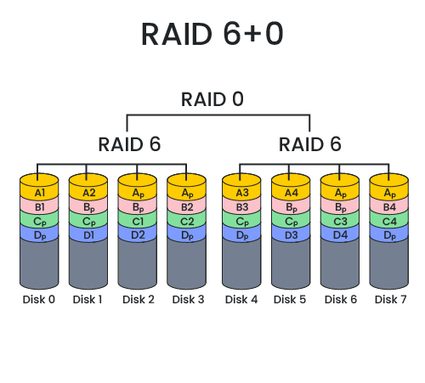
As you might be able to guess, RAID 60 consists of several RAID 6 sub-arrays striped together. This configuration means that two disks can fail per sub-array without data loss. Usable capacity starts from 50%, though read performance is less than RAID 50, as RAID 6 dedicates two drives per sub-array to parity data.
Our calculator can act as the RAID 10 calculator, RAID 50 calculator, and RAID 60 calculator as well!
RAID 5E, 5EE
These two RAID levels extend RAID 5 by adding a hot spare drive, and so require a minimum of 4 disks, compared to RAID 5's three-disk minimum. RAID 5E stores the additional space at the end of each drive, while RAID 5EE distributes the extra space throughout the RAID. When a drive fails, the RAID 5E/5EE array can use the spare drive space to start rebuilding straight away, without needing to wait for someone to manually remove the failed drive and insert a fresh one into the array.
Which RAID level should I choose?
The right RAID level for you depends on your application. If performance is most important, then RAID 0 is the right choice, as you can start with just two disks, making it the cheapest option. Just expect to lose all your data when a drive fails. If you need good fault tolerance, but want fast rebuild times, then RAID 10 is the right choice, though it only has a capacity utilization of 50%. Each RAID level has its pros and cons. It's best to try out some possible configurations using our calculator. Let's show you how to use it.
How to use this RAID calculator?
Here is a step-by-step guide to using our RAID storage calculator:
-
Select the RAID level that you want to examine. All of the ones discussed above are available.
-
Enter the size of a single disk drive. Note that this RAID storage calculator assumes that all the disks in the RAID array are the same size. If you have a mixture of sizes, enter the size of the smallest drive.
-
Enter the number of disks you want to use in your RAID configuration. Different RAID levels have different minimums or require an even or odd number of disks. Don't worry, the helpful calculator messages will guide you.
-
In the capacity statistics section of the calculator (RAID size calculator), you will see the usable capacity of your RAID array, the unavailable capacity, and the usable capacity as a percentage (capacity utilization).
-
The next section of the calculator is the RAID speed calculator and shows the maximum read and write performance relative to using a single disk. Note that these are approximate theoretical figures, but they are useful when comparing different RAID levels. This section also shows the fault tolerance of the RAID. Hover your mouse over the words "Fault tolerance" to double-check the meaning of the number, as this will change for different RAID levels.
-
If you are interested in calculating and comparing the costs of different RAID configurations, enter the cost of one disk. The calculator then displays the cost per usable terabyte of storage and the total disk cost. Note that it only calculates the cost of the disks and not any extra dedicated RAID controller hardware required for some RAID levels.
Worked example of comparing RAID 6 vs. RAID 10
The RAID 6 array consists of 5 disks, all 1 TB in size. RAID 6 uses two parity blocks per data stripe. That translates as effectively two disks worth of parity data, meaning that the amount of usable capacity is 3 TB, with 2 TB being unavailable. To calculate the capacity utilization as a percentage, we do:
capacity utilization = (usable capacity / total capacity) × 100
Plugging in the numbers for this example, we get:
capacity utilization = (3 / 5) × 100 = 60%
We've effectively got two disks in the RAID storing parity data, which leaves three drives we can read from simultaneously, giving a maximum theoretical read speed factor of 3x. In general, for RAID 6, the equation for the read speed gain is:
read speed gain RAID6 = no. disks - 2
The fault tolerance for RAID 6 is that up to two disks can fail without data loss and doesn't depend on the number of drives in the array.
Finally, for the cost calculations, let's say that each disk costs $50, which gives a total cost of 5 × $50 = $250. To calculate the cost per usable TB of storage, use:
cost per usable TB = total cost / usable capacity
Which for this example is:
cost per usable TB = $250 / 3 TB = 83.33 $/TB
Another standard option these days is RAID 10. Let's say we want to achieve the same amount of usable capacity as the RAID 6 example above. How will the RAID 10 option compare?
RAID 10 always has an even number of disks and has a capacity utilization of 50%. So if we want 3 TB of usable storage, we are going to need double the total amount of storage, so 6 x 1 TB disks.
For RAID 10, we can read from all the disks at once, so the maximum read speed gain is simply the total number of drives (6 in this example, as the RAID 10 minimum drives is one more than that for RAID 6). For writing, we can write to half the number of disks at once, so that means a maximum write speed gain of 3x. That's much better than RAID 6, which had no increase.
The fault tolerance of RAID 10 is nominally the same as RAID 6, namely two drives. However, for RAID 10, it can lose one disk per half of the array. So if you were unlucky enough to have two drives fail in the same half of the array, data loss would occur. So the fault tolerance of RAID 10 isn't quite as good as RAID 6.
Given that the capacity utilization of RAID 10 is 50% (compared to 60% in the RAID 6 example), this RAID 10 array is going to cost more:
cost per usable TB = (6 × $50) / 3 TB = 100 $/TB
In summary, the RAID 6 example is significantly slower at writing data but has better fault tolerance and is slightly cheaper (in terms of disks) than the equivalent RAID 10 array. However, different applications make different demands on reading and writing to a disk. How much time will be spent writing data compared to reading data? The answer to this question will determine how vital read speed versus write speed is to your choice of RAID level.
As an exercise, why not try comparing RAID 10 vs. RAID 5? What is the minimum number of drives for RAID 5 compared to RAID 10? Check it with our RAID calculator!
FAQs
How many drives do I need for RAID 5?
To set up RAID 5, you need a minimum of three drives. This setup allows one drive to fail while still retaining all the data, as the data and parity are distributed across all the drives in the array. However, the more drives you include in the RAID 5 array (up to a certain limit dependent on your hardware and needs), the more fault-tolerant your system becomes, as long as only one drive fails at a time.
How much speed do I gain from raid 0?
Using RAID 0, you'll see faster data read and write speeds compared to a single drive. This happens because RAID 0 splits data across multiple disks, allowing simultaneous access. However, the exact speed gain depends on the number of drives and their individual speeds.
How do I test speed of my raid?
To test the speed of your RAID:
- Use a disk benchmarking tool like CrystalDiskMark or ATTO Disk Benchmark.
- Run the tool to measure read and write speeds.
- Compare results to typical speeds for your RAID type.
This will show your RAID's performance.
How do redundant array of independent disks work?
RAID (Redundant Array of Independent Disks) works by:
- Combining multiple hard drives into one system;
- Distributing data across these drives for safety or speed;
- Using different RAID levels for various needs, like mirroring or splitting data; and
- Enhancing data protection and improving performance.